Parametric Equalizer
The parametric equalization screen appears in landscape mode and will not rotate to portrait mode. This in intentional.
Equalization is the process of increasing or decreasing the strength of one or more frequency range(s) in an audio signal.
A "band", in context of equaliztion, is the encapsulation of a frequency range where equalization is applied. In typical usage,
an equalizer has the capability to manipulate multiple bands.
A parametric equalizer allows for the manipulation of three characteristics: 1) the center frequency of the band;
2) the bandwidth (the frequency range) of the band; and 3) the strength of the audio signal in the band (commonly
referred to as the gain, amplitude or boost/cut).
Center Frequency Frequency is specified in hertz (Hz) where 1 Hz is one cycle per second. The higher
the hertz, the higher the frequency. The hertz scale is logarithmic. Going one octave higher in pitch
results in the doubling of the frequency.
Bandwidth The most common way of specifying the bandwidth in parametric equalizers is the "Q" value.
The lower the Q-value, the wider the bandwidth. The classic parametric equalizer design specifies that the bandwidth
encompasses the frequency range where the final 3db of the boost/cut takes place, not the full range of affected
frequencies in a band.
Gain The gain of an audio signal is specified in decibles (db). The decible scale is also logrithmic.
The following is a listing of how decible changes are perceived:
- 1 db - imperceptible change
- 3 db - barely noticeable change
- 5 db - clearly noticeable change
- 10 db - about twice as loud
Yamp and frequency In Yamp, the center frequency can be specified and can be displayed as either a hertz
value or a musical note pitch (English). The note pitch is specified as the [note name - octave] where "C4" is
middle C. A slider used to change the Q value, with the range of the Q value shown in either hertz or musical note pitches.
Parametric equalizer implementation The Yamp parametric equalizer uses the parametric equalizer capabilities in
Apple's iOS Audio Units implementation.
Use of the Parametric Equalizer in Yamp
Previous versions of Yamp incorporated the fixed iOS system equalizer presets, accessible by pressing the equalizer button
at the top of the screen (3rd button from the left), which in turn presented a "picker" of presets.
In order to use the parametric equalizer, a parametric equalizer preset must be created. It is then added to the
existing preset picker. Parametric equalizer presets can be applied to tracks in a playlist. There may be occasional
"stuttering" when using the parametric equalizer with 24-bit audio tracks with older A5-based iPads (original iPad Mini, iPad2).
(This version of Yamp does not work on the original iPad).
Parametric equalization presets are stored in the "eqPresets" folder. Do not delete this folder or its contents.
Creating a new Parametric Equalizer Preset in Yamp
There are two methods to access the parametric equalizer create functionality. Either: 1) Tap the equalizer button
(third button from the left) at the top of the screen, 2) select the "Disabled" preset, 3) close the picker,
4) Double-tap the euqualizer button.
OR: 1) Go into organize mode (second tab from the left on the tab bar at the bottom of the screen), 2) Press the
"Extras" button, 3) Select "Create EQ Preset". When either of these actions are done, a screen with picker asks
how many bands should be created in a new preset. Make a selection and press the "Create bands" button.
Using and Editing an Existing Parametric Equalizer Preset in Yamp
Using a parametric equalizer preset is similar to using the sytem presets. Press the equalizer button
at the top of the screen (3rd button from the left) and select the desired preset from the picker.
The first preset is the "Disable" preset (no equalization applied). Next, the parametric equalizer presets
will be listed in alphabetical order. After that, the system presets (starting with "Acoustic") are listed
in alphabetical order.
In order to edit a parametric equalizer preset, 1) select the preset, 2) close the picker and then 3) double-tap
the equalizer button. Apple user-interface guidelines discourages the use of multi-tap gestures in a picker.
The Parametric Equalizer Edit Screen
When editing or creating a new parametric equalizer preset, the following will appear:
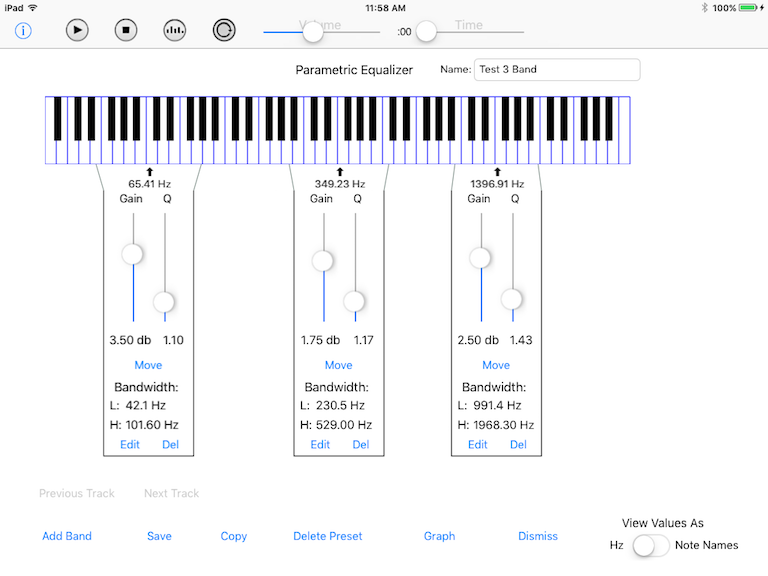
Features of the editing screen include:
- An illustration of a standard 88-key piano keyboard is presented to aid matching the frequency values with musical note
pitches.
- The name of the equalizer preset is show in the upper-right in a text field which is used to edit
the preset name. Presets are limited to 20 characters in length and duplicate preset names are not
allowed.
- Bands are represented by the boxes below the keyboard. Moving a box changes the center frequency of a band.
The lines connecting these boxes to the keyboard indicate the bandwidth of the band.
- The switch at the bottom right corner allows center frequency and bandwidth values to be viewed as
either musical note pitch names or in hertz.
- Important! Changes to an equalizer preset must be saved after any modification - they are not automically saved.
The parameters of a band are edited by using controls in the band box. These include:
- Sliders for the gain and Q value. The lines connecting the band box to the keyboard will move
in response to moving the Q value slider. The parameter values can be manually edited if it is difficult to
specify precise values with the slider (see below).
- The gain slider moves in increments of 0.25 decibel.
- In order to change the center frequency, press the "Move" button and move it right or left. Band boxes
can be moved over and can be overlapped with other band boxes and will have some transparency when this is done. In order to use
a center frequency beyond the limits of the screen, parameter values can be edited as described below.
- To delete a band, press the "Del" button.
- Pressing the "Edit" key allows for the manual editing of band values. A screen will appear which
will allow values to entered for the 3 parameters. The "Do not move band box when frequency changed"
switch allows one to keep the band box stationary even after changing the center frequency using this screen.
However, once the "Move" button in the band box is pressed again, this directive will be ignored.
Real-Time Interaction
One can listen to a track while the bands are being edited to hear how changing the parameters
on the different bands affect the sound of the track. To do his, first, select an audio track (either a FLAC file
or a local non-FLAC file). Select a parametric equalizer preset.
Open the parametric equalizer screen and press the "Play" button at the top left of the screen.
The "Prev Track" and "Next Track" buttons allow one to listen to different tracks in a directory or playlist. The
track name appears to the right of these buttons.
The "Prev Track" and "Next Track" buttons will only navigate to audio files that have the same characteristics
(sample rate, bit-depth, encoding, etc.) as the original audio file that was selected. To listen to an audio track in the
same directory with different characteristics, dismiss the parametric equalizer edit screen, select the audio
track and re-open the parametric equalizer edit screen.
Graphing the Audio Wave of a Track
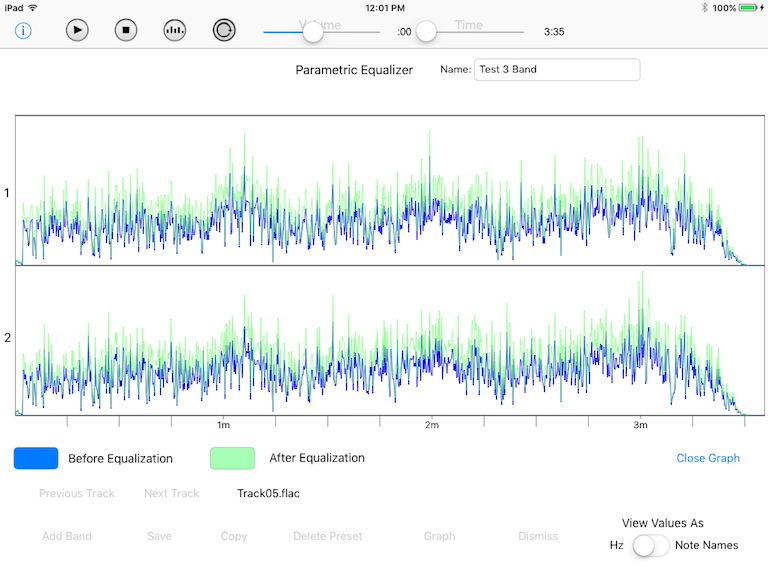
If a FLAC or local non-FLAC track is selected, a graph of the audio file can be viewed by pressing the "Graph" button
from the parametric equalizer edit screen. Two channels (left = channel 1, right = channel 2) are shown.
The main purpose of the graphing facility in Yamp is to show
if equalization will approach or go beyond the maximum dynamic range of the original recording.
In general, if equalization results in a preponderance of values close to maximum, an undesirable result will occur.
Once the "Graph" button is presed, a progress box with the option to cancel will appear.
Important note: On an iPad Mini 4, it takes about 12 seconds to graph
a 3-1/2 minute audio track. For larger files, the time required increases more or less proportionally. The number of bands (tested to
ten bands) has minimal effect on processing time. It takes about 67 percent
more time to process a 24-bit 88.2/96khz audio track. The original iPad Mini is about 3.75 times slower than the iPad Mini 4 in
processing a graph.
The graphing feature is processing-intensive and should not be used if batttery life needs to be preserved.
Understanding the Audio Wave Graph.
- The audio wave before equalization is show in blue. The after-equalization wave is in light green.
- Time is represented on the X-axis, with the entirety of the track shown on the screen. Scrolling of longer audio
files may be available in future versions of Yamp.
- The points in the graph represent the highest value of the samples with a specific time period. Negative values
are converted to positive values for the purposes of this graph. Most consumer digital
recordings store data as integers. When this is done there is a set minimum and maximum value. Current iOS devices convert
integer-based audio wave data into
floating-point numbers with a range from -1.0 to 1.0. When the audio signal is boosted, numbers above 1.0 are possible because
floating-point numbers have a range greater than -1.0 to 1.0.
The graphs in Yamp have a range of 0 to 1.0 (remember negative values are changed to positive values), so values above 1.0
(will only occur in the equalized data, not the original audio track data) are shown as a value of 1.0.
- Controls on the equalizer edit screen are inactive while the graph is being displayed. Use the "Close Graph" button
to close the graph screen and return to the parametric equalizer edit screen.
If the graph indicates values at or close to the maximum, the easiest solution is to reduce the gain in the bands. If one wants
to retain the gain in the bands, another possible solution is to reduce the gain on the existing bands and then add additional
bands with negative gain values. Finally, the current version of Yamp now allows the "Volume Boost" feature to reduce the wave
strength to 0.5 or 0.75 (with 1.0 being an un-altered wave). The reduction in the wave strength occurs after equalization
but as noted before, iOS allows values outside the original range of values in integer-based formats. Thus, if reducing the wave
strength results in values within the -1.0 to 1.0 range, what gets passed to the electronic audio circuitry of the iPad is similar
to sending the original wave (which will be in the -1.0 to 1.0 range) to the audio circuitry. This technique may or may not produce satsifactory
results. Audio tracks that work well with equalization are those that have been
well-mastered and have good headroom. Volume boost settings are not stored with the equalizer preset. A playlist can store the preset
name and volume boost setting.
Suggestions in Using the Parametric Equalizer
More is not better. Determine the frequency ranges where the wave strength needs to be modified and limit the bands to the
minimal amount needed to achieve the desired goal.
More is not better, part 2. A gain/reduction of about 3-6 db is typical. Values below that are difficult to hear and values
above that are can be difficult to listen to for long periods of time.
All that glitters is not gold. At first, equalization changes may sound enticing but over a longer period of time may result in
listening fatigue.
.